Using the UI to Export Code for Custom Fields
Sometimes, when extracting a content type from a custom module, you may want to include fields associated with that content type. Automatically creating fields allows you to remove and reinstall on multiple sites without leaving behind unnecessary fields and ensures you don’t forget to add them. There are two ways to add these fields to your codebase, which we’ll cover here.
Prerequisites
- Drupal 8.0.x is installed.
- You have a custom module (the module name used in this example is
foobar). - You have a custom content type in the module (please follow the instructions on the parent page. The content type name will be Car Brand).
Adding Additional Fields to the Content Type
There are two ways to do this. You can use the UI to create fields and export the configuration into files, or you can write the files manually. I prefer the first option to ensure you don’t miss anything Drupal requires. Note that fields will be exported with a field_ prefix rather than a foobar_car_brand_ prefix to associate them with the content type. This guide focuses on using the UI to create fields and export the code for use in your custom module.
Using the UI to Create Fields
As mentioned, this method is more suitable for users who are less familiar with Drupal’s field configuration requirements.
Enable the Custom Content Type
If you haven’t enabled the foobar module as instructed on the parent page, do so now. When you go to the “Create Content” page, you should see an option to create a new node of the “Car Brand” content type.
Go to /admin/structure/types/manage/car_brand/fields
With the module enabled, navigate to the field management section of your content type. Add all the fields you want. Make sure to include a field named Brand Information (field_brand_information) of type Text (formatted, long, with summary) and delete the default Body field. Leave everything else as default.
Using the UI to Export Field Configuration
Go to: /admin/config/development/configuration/single/export
After adding your fields, go to the Configuration Synchronization page. There are three tabs at the top. Select the “Export” tab, then choose “Single item.”
Export the Configuration
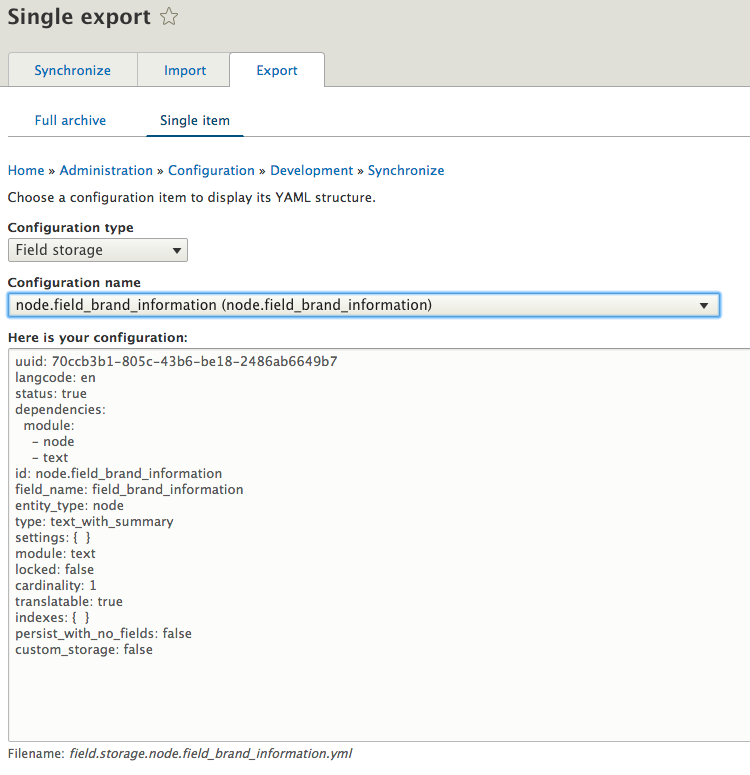
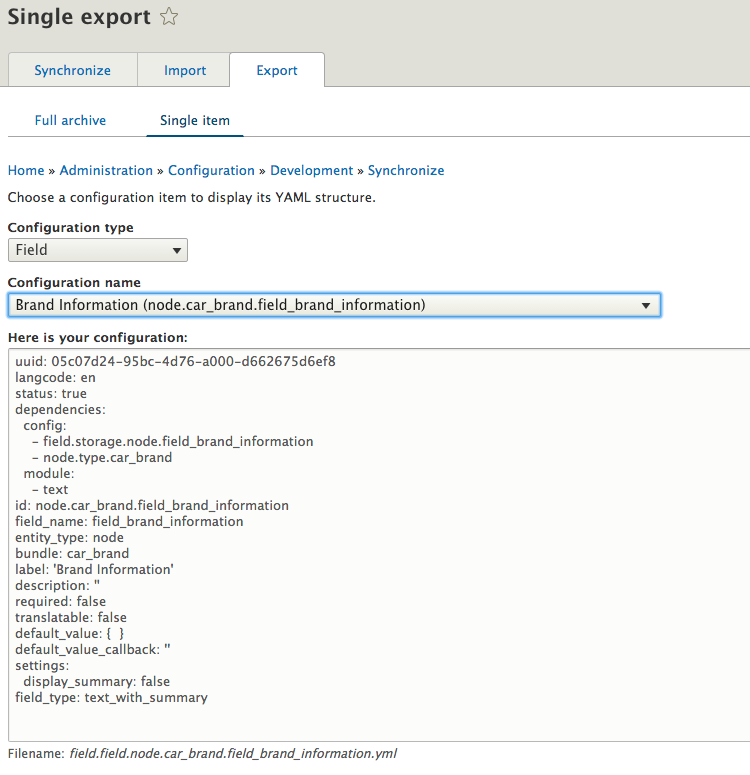
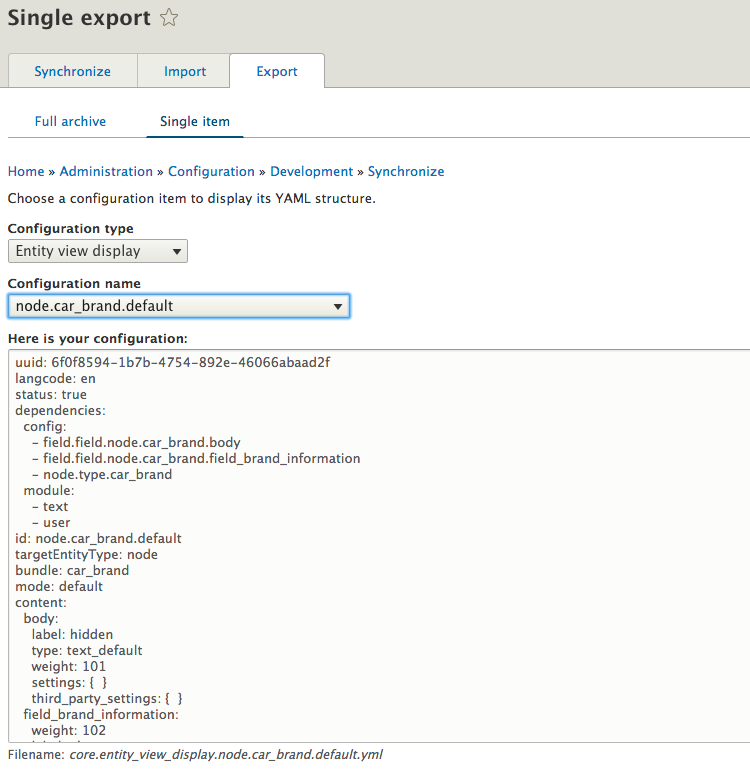
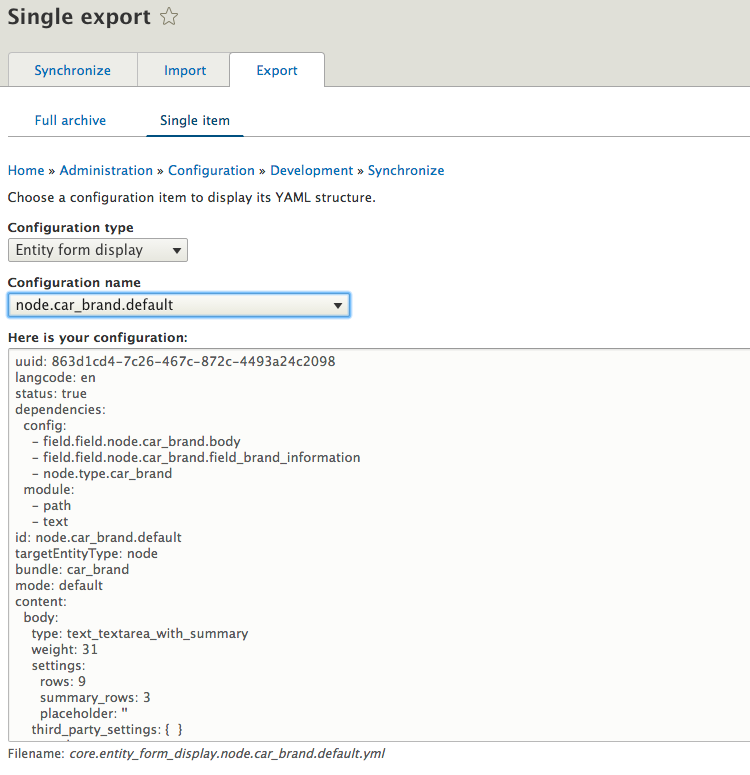
Below are four screenshots illustrating the items to export for the field_brand_information field:
- Field Storage
- Field
- Entity View Display
- Entity Form Display
Below the configuration code block, you’ll see the suggested file name to create in your custom module. Copy everything from the configuration code into the specified file, excluding the first line starting with uuid:.
Note: If you added additional fields, you’ll need to export the field and storage for each. The same applies if you created multiple displays (like a teaser). This example includes only the default displays.
modules/custom/foobar/config/install/field.storage.node.field_brand_information.yml
modules/custom/foobar/config/install/field.field.node.car_brand.field_brand_information.yml
modules/custom/foobar/config/install/core.entity_view_display.node.car_brand.default.yml
modules/custom/foobar/config/install/core.entity_form_display.node.car_brand.default.yml
Disable and Re-enable the foobar Module
Once you’ve added all your field configurations to your codebase, it’s time to disable the foobar module. After disabling it, re-enable it and verify whether your custom fields are included. Go to the “Create Content” page—you should be able to create a new “Car Brand” node, and it should include the Brand Information field along with any other fields you created.